Rivian Mom
Active Wheeler
- Joined
- Oct 20, 2024
- Messages
- 351
- Reaction score
- 30
- Rivian
- R1S
There is a YouTube video for this mod from a vendor that helped, but thought I would add some info here as it's actually even easier than I thought. This in general is a really easy install for those willing and I'm surprised more are not doing this. So I will go into some details. Priced well and I personally like that it is steel too:

Install tips
- You don't need to remove wheel or lift the vehicle. If tires are on smooth flat surface you can turn them by hand even with weight of vehicle on them. If want to make it easier just use simple bottle jack to partially jack it up with jack puck on frame location, but certainly don't need it all the way off ground.
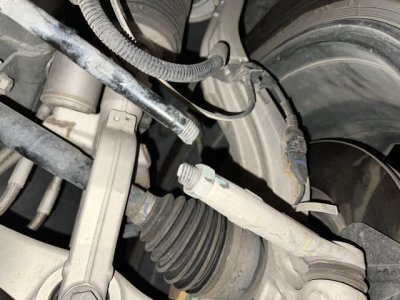
- Use 21 mm wrench to break loose the outer tie rod jam nut while holding the tie rod end with another wrench (adjustable works good for this ... the outer tie rod has a molded square section for this wrench). Its not torqued too much.
- Use 21mm deep socket to break loose the nut on the steering knuckle using a breaker bar as it is heavily torqued
- Just push the tire out a little by turning it with hand on each side of the tire. It moves fairly easily. This gives you some clearance to pull the tie rod end all the way out of the knuckle. Mine sat loose in the knuckle so was no need to shock the tapered ends out of knuckle.
- Might need to push/turn tire out more to get the ends all the way off as is just enough clearance to do this without removing wheels.
- The tie rod ends usually already have a green marking on them from factory ... this just helps to count the number of turns to remember when removing them.
- On the YouTube install video for the sleeves I noticed the guy mentioned found his tie rods were screwed in 19 turns. When I took mine out found it was 21.5 turns on driver and just shy of a full 22 turns on passenger side (the difference is basically where the threads start to engage). So basically ~3 turns difference between his and mine. This was suspicious to me so I certainly made note of this, but each vehicle can be a bit different. If having any steering wheel shake/feedback on minor road imperfections but no shake on smooth pavement.
- When DHD sleeve is installed it will then be a 7/8in wrench to tighten the sleeve in the place of the jam nut it replaces. Hold the tie rod end straight with another wrench
I know what the first reply will likely be in these EV forums, so I will address the "elephant in the room" now. I always upgrade tie rods, radius rods, and other various suspension components on my more dedicated off road vehicles I have as none of the OEMs make these strong enough (even in dedicated off-road industries). None of these have damaged steering racks, frame, mounting tabs, etc. after a lot of abuse.
After seeing the multiple bent tie rods and some that have happened for no obvious reason, I am not going to risk it out on remote forest roads and similar. I know from many years of experience in true off-roading, the whole fear mongering thing of "then the forces get transmitted to the rack" is just not the reality. The tie rods are simply weak parts that need upgrading for confidence and where they machine in the threads (where they almost always bend at) is just too weak and has nothing to do with an "engineered weak point to save other components".
I have seen entire wheels and suspension completely sheered off of vehicles and barrel rolled my stuff multiple times and still never seen the actual steering rack be bad. It certainly can happen, but that is usually the last thing that goes. The cases where factory replaces the steering racks saying was damaged is usually a last ditch effort to try and resolve something they have no other ideas for. The ball joint or even the steering knuckle connection point will usually sheer before steering rack gets damaged and its extremely hard to break those unless factory defect. The bulk of leverage is on the outer tie rod and the forces are not inline with the rack so does not transmit much to the rack itself. Anyways ...
Related to the above, it might be worth noting these sleeves actually float over the stock tie rods a little. I should have measured but it felt like maybe 1/16in clearance between the sleeve and rod. So, the rod will still "flex" vs a full rod replacement or clamped on sleeve. I personally don't think this is much of a true "benefit" and would have no problem with even a beefier full end to end tie rod replacement directly to the rack, but perhaps this info makes some more comfortable with this mod as it is allowed to naturally flex a little but stops it before bending essentially. Also, there is still a small section of non-sleeved rod exposed that is also the smaller diameter section of rod (but does not have threads) before the inner boot, so if you still want to go with whole "its engineered to break before damaging other parts" thing, it still has an opportunity to do just that in theory.
I am not associated with manufacturer and none of this is is even mentioned as a feature on their site ... just an observation. They probably designed it this way in reality to help ensure easy installation, even over a slightly tweaked tie rod. Again, the threads on the rod to allow adjusting toe/alignment is where the true weakness is, that is not accounted for by the OEMs and this mod takes care of that. If you are really cheap, just add a couple extra lock nuts to cover the bulk of exposed threaded area and that too would help with each thread covered/supported.


