Rivian Mom
Member
- Joined
- Oct 20, 2024
- Messages
- 148
- Reaction score
- 24
- Rivian
- R1S
A fellow Rivian owner in our group shared with me his experience he had with his tailgate and how he got it fixed. So right off the lot he received an error that the tailgate is open and it took a good slam to get it shut. Shortly after that, it would only shut by holding the tailgate closed and pressing the release button. Shortly after that, it would randomly open when driving down the road. Then finally, the tailgate would no longer close at all. This occurred over a few weeks time.
So he setup a service center visit to get this issue resolved. At the time he setup the service appointment, he was still able to get the tailgate to latch. Then two days before his big road trip, in which he planned to load up a bunch of gear in the back secured and protected below the tonneau cover, the tailgate stopped latching at all.
Determined to keep on keeping on, he decided to fix the latches himself. Turns out it was a simple fix, just took a little time and effort. In his case, I think one of the latches was beyond repair, but the fix got them both working for a couple weeks time. Enough time to get him to his service center appointment.
The issue: The 4 bolts (two on each side) fastening the latch mechanisms into place have were over-tightened at the factory. Which resulted in deforming the mechanism to the point where it no longer works properly. He said you could hear the mechanism try to work 3 times before giving up and not latching. He advised that before doing any work, you should inspect this by flipping the latch mechanism with your finger. If there is any resistance and it does not spring freely back into place, then the bolts are definitely pinching the mechanism too hard and binding up the latch mechanism. So I'd just share the steps he shared with me on how to get it fixed (at least temporarily until you can get to your service center appointment).
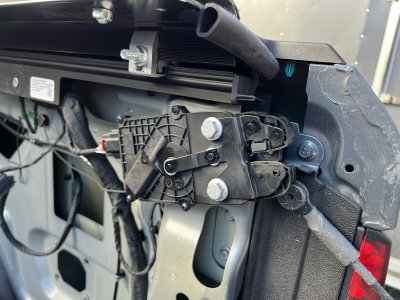
The fix: Loosen and re-torque the bolts holding the latch mechanisms in place. In my case, the left side seems salvageable but the right side was deformed beyond repair and must be replaced. He was able to get the right side working for only a short amount of time before it gave up again.
Tools you will need: Picks, trim removal tool, metric socket set, star key set, torque wrench.
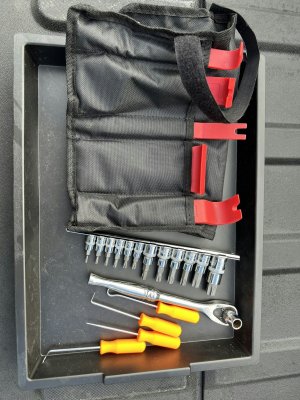
Steps 1. Remove the front truck bed plastic panel (the one just behind the cab). This is necessary to be able to remove the side panels. (After watching the service center replace these, it is possible to skip this step and just pry back the side panel rather than remove them). To do this, pull off the round plastic caps and remove the 6mm bolts using a 10mm socket. Note the plastic caps clip onto metal washers behind them, you must use the pick tool on the very edge of these caps or you will just be pulling on the metal washer that is bolted in place behind it. You can hook the pick behind these caps approximately 1mm or so.
Step 2: Remove the bolts holding the 4 tie-down rings in place using the appropriate size star key. Remove the push-in plastic trim rivets located near the tailgate, one on each side. A trim removal tool is best for this. Remove all the round plastic caps. Remove the bolts with a 10mm socket. Note that that there is one long bolt on each side that is a different color. Remember to put this back in the same location it was removed from when reinstalling.
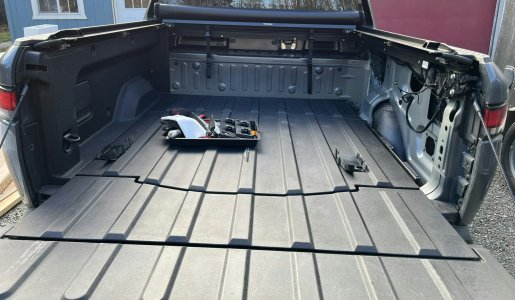
Step 3: Optional: The right side (passenger side) panel can be removed by disconnecting the wiring for the light and the outlets. The left side (driver’s side) panel will need to remain dangling in place so as not to fiddle with the air pump connections. This is fine as there will be plenty of room to work with this panel loose.
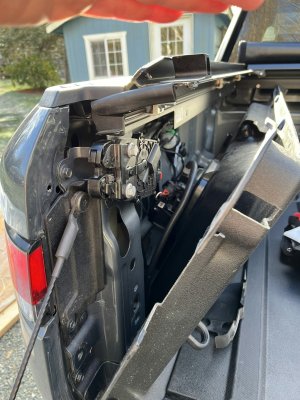
Step 4: Loosen the bolts that hold the latches in place, two on each side. Torque these bolts back down to 10 Nm. Make sure the latches move freely, see below videos. If the latches were over torqued from the factory then they are likely deformed a bit. 10 Nm is the spec for new latches but you may need to go a little less than that if the latch is still not moving freely. Note that even after I retorqued all of these on my vehicle, my right side latch still failed again after a couple weeks.
Step 5: Try it out. First, use your finger to flip the latch mechanism to ensure that it moves freely and springs back into place. Next, close the tailgate gently. If one or both sides still don’t work, either they are still torqued down too hard, they are slightly misaligned with the rings on the tailgate, or they are beyond repair and need to be replaced. In my case these mechanisms were torqued down so hard at the factory that I could see how deformed and smashed they are (sorry I didn't get good photos of this). You will also notice that the mechanisms do not move freely before you loosen the bolts and after you loosen the bolts, the latches should free right up. These mechanisms seem to be pretty delicate. Seems like they should have been manufactured with metal spacers rather than allowing the plastic to be pinched and deformed like that.
Step 6: Put it all back in reverse order (and don’t forget to plug the lights and power plugs back in). For the tie down bolts I think I went with 20-25 ft-lbs and for the 6mm bolts I think I went with 10-12 ft-lbs. Finger tighten everything first to ensure alignment of all the panels. Again, those torque values are arbitrary and not official values from anywhere but hopefully that gives you a starting point. Note that the 6mm bolts seem to be coated in a separator material. I suspect this is to prevent galvanic corrosion. This makes sense as some of them appear to be steel bolts threading into tapped aluminum (I could be wrong on that). Just in case I suggest applying a separator of some kind. The only thing I had on hand was liquid Teflon which should do the trick (but can be very messy).
I just thought I’d throw this out there in case it was helpful for anyone else. I definitely recommend going through Rivian service to avoid voiding any warranties, but hey, in a pinch, you may be able to get it going again while you wait for that service visit like he did. It did take some time, but he did it and was able to load up the back with gear for his trip into the mountains.
So he setup a service center visit to get this issue resolved. At the time he setup the service appointment, he was still able to get the tailgate to latch. Then two days before his big road trip, in which he planned to load up a bunch of gear in the back secured and protected below the tonneau cover, the tailgate stopped latching at all.
Determined to keep on keeping on, he decided to fix the latches himself. Turns out it was a simple fix, just took a little time and effort. In his case, I think one of the latches was beyond repair, but the fix got them both working for a couple weeks time. Enough time to get him to his service center appointment.
The issue: The 4 bolts (two on each side) fastening the latch mechanisms into place have were over-tightened at the factory. Which resulted in deforming the mechanism to the point where it no longer works properly. He said you could hear the mechanism try to work 3 times before giving up and not latching. He advised that before doing any work, you should inspect this by flipping the latch mechanism with your finger. If there is any resistance and it does not spring freely back into place, then the bolts are definitely pinching the mechanism too hard and binding up the latch mechanism. So I'd just share the steps he shared with me on how to get it fixed (at least temporarily until you can get to your service center appointment).

The fix: Loosen and re-torque the bolts holding the latch mechanisms in place. In my case, the left side seems salvageable but the right side was deformed beyond repair and must be replaced. He was able to get the right side working for only a short amount of time before it gave up again.
Tools you will need: Picks, trim removal tool, metric socket set, star key set, torque wrench.

Steps 1. Remove the front truck bed plastic panel (the one just behind the cab). This is necessary to be able to remove the side panels. (After watching the service center replace these, it is possible to skip this step and just pry back the side panel rather than remove them). To do this, pull off the round plastic caps and remove the 6mm bolts using a 10mm socket. Note the plastic caps clip onto metal washers behind them, you must use the pick tool on the very edge of these caps or you will just be pulling on the metal washer that is bolted in place behind it. You can hook the pick behind these caps approximately 1mm or so.
Step 2: Remove the bolts holding the 4 tie-down rings in place using the appropriate size star key. Remove the push-in plastic trim rivets located near the tailgate, one on each side. A trim removal tool is best for this. Remove all the round plastic caps. Remove the bolts with a 10mm socket. Note that that there is one long bolt on each side that is a different color. Remember to put this back in the same location it was removed from when reinstalling.

Step 3: Optional: The right side (passenger side) panel can be removed by disconnecting the wiring for the light and the outlets. The left side (driver’s side) panel will need to remain dangling in place so as not to fiddle with the air pump connections. This is fine as there will be plenty of room to work with this panel loose.

Step 4: Loosen the bolts that hold the latches in place, two on each side. Torque these bolts back down to 10 Nm. Make sure the latches move freely, see below videos. If the latches were over torqued from the factory then they are likely deformed a bit. 10 Nm is the spec for new latches but you may need to go a little less than that if the latch is still not moving freely. Note that even after I retorqued all of these on my vehicle, my right side latch still failed again after a couple weeks.
Step 5: Try it out. First, use your finger to flip the latch mechanism to ensure that it moves freely and springs back into place. Next, close the tailgate gently. If one or both sides still don’t work, either they are still torqued down too hard, they are slightly misaligned with the rings on the tailgate, or they are beyond repair and need to be replaced. In my case these mechanisms were torqued down so hard at the factory that I could see how deformed and smashed they are (sorry I didn't get good photos of this). You will also notice that the mechanisms do not move freely before you loosen the bolts and after you loosen the bolts, the latches should free right up. These mechanisms seem to be pretty delicate. Seems like they should have been manufactured with metal spacers rather than allowing the plastic to be pinched and deformed like that.
Step 6: Put it all back in reverse order (and don’t forget to plug the lights and power plugs back in). For the tie down bolts I think I went with 20-25 ft-lbs and for the 6mm bolts I think I went with 10-12 ft-lbs. Finger tighten everything first to ensure alignment of all the panels. Again, those torque values are arbitrary and not official values from anywhere but hopefully that gives you a starting point. Note that the 6mm bolts seem to be coated in a separator material. I suspect this is to prevent galvanic corrosion. This makes sense as some of them appear to be steel bolts threading into tapped aluminum (I could be wrong on that). Just in case I suggest applying a separator of some kind. The only thing I had on hand was liquid Teflon which should do the trick (but can be very messy).
I just thought I’d throw this out there in case it was helpful for anyone else. I definitely recommend going through Rivian service to avoid voiding any warranties, but hey, in a pinch, you may be able to get it going again while you wait for that service visit like he did. It did take some time, but he did it and was able to load up the back with gear for his trip into the mountains.
Last edited:

