Vincent
Active Wheeler
- Joined
- Oct 16, 2024
- Messages
- 244
- Reaction score
- 26
- Rivian
- R1T
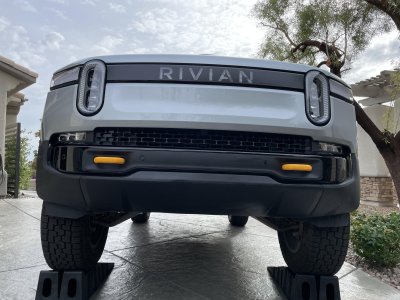
Recently figured out how to remove the lower front bumper for my R1T when I assisted a friend to get his done. We scraped up the silver fascia below the main bumper. Rather than costly repair for high wear area, we removed, sanded, and painted it. Would share pictures below
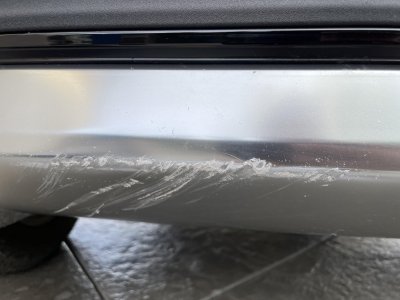
Tools/Supplies:
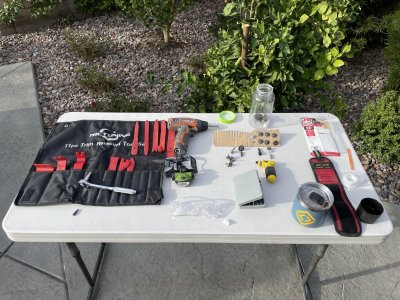
1. Torx Set (3 different bit sizes)
2 Nut driver
3. Short angled handle ratchet screwdriver (tight space)
4. Ratchet driver
5. Trim puller set
6. Black textured bedliner spray paint
7. Sandpaper
Steps:
1. Remover rubber cover directly behind the lower fascia with different size Torx bits (20 total). The front four tie into the lower fascia.
2. Remove lowest two screws holding front wheel well covers. This will allow you to pull the cover back to expose the machine screws (one on each side) attaching the fascia to the frame. This is a tight space, so you can only ratchet it out a quarter turn each time.
3. These four tabs on the fascia are held in place by four white plastic retaining tabs (see next step).
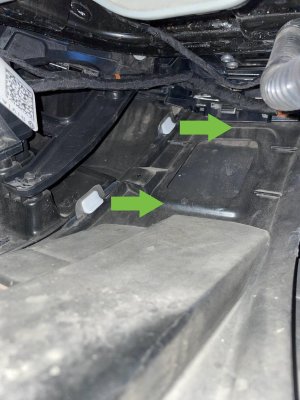
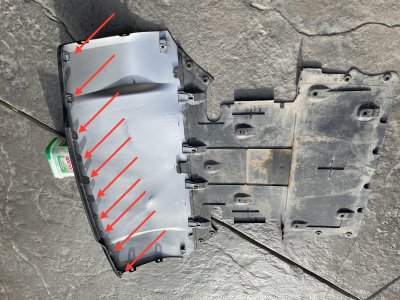
4. Remove 4 retaining clips holding the fascia tabs in place. The third picture is a close up next to the removed fascia. These will come out easier if a helper can apply upwards pressure on the fascia while you are wiggling them out. These are kind of a pain because you are elbow deep working blind while propped up on your other elbow. (How’s that core strength?!)
5. Okay…here’s the Big Boss at the end of the game. The front part of the fascia is held in place by no less than 10 tabs that are almost identical to the bastard tabs holding the hitch cover in place. This is where the trim pullers are essential. There is almost no space to get behind or grab the fascia to pull it forward. Use cardboard to protect the glossy bumper as you work your way from one side to the other. No two ways about it - have to be super aggressive. Once you pop the first one, the other are a smidge easier. (I watched the Munro Live frunk tear down, but wasn’t confident that would allow easier access to these, and would most likely add a lot more steps removing the frunk liner.) Make sure you have something to super the fascia so it doesn’t droop while you are getting past the mid line. I did not and the fascia kind of warped and partially tore the last two tabs. Don’t worry - there are at least a few on eBay if you completely botch it!
All that’s left is to sand and paint, and reverse the steps (infinitely easier). I was amazed at how well the bedliner texture and black color perfectly matched the adjacent rubber bumper parts. If he scrapes this area again, it will be a quick touch up job. Here is an after photo

Tools/Supplies:

1. Torx Set (3 different bit sizes)
2 Nut driver
3. Short angled handle ratchet screwdriver (tight space)
4. Ratchet driver
5. Trim puller set
6. Black textured bedliner spray paint
7. Sandpaper
Steps:
1. Remover rubber cover directly behind the lower fascia with different size Torx bits (20 total). The front four tie into the lower fascia.
2. Remove lowest two screws holding front wheel well covers. This will allow you to pull the cover back to expose the machine screws (one on each side) attaching the fascia to the frame. This is a tight space, so you can only ratchet it out a quarter turn each time.
3. These four tabs on the fascia are held in place by four white plastic retaining tabs (see next step).

4. Remove 4 retaining clips holding the fascia tabs in place. The third picture is a close up next to the removed fascia. These will come out easier if a helper can apply upwards pressure on the fascia while you are wiggling them out. These are kind of a pain because you are elbow deep working blind while propped up on your other elbow. (How’s that core strength?!)
5. Okay…here’s the Big Boss at the end of the game. The front part of the fascia is held in place by no less than 10 tabs that are almost identical to the bastard tabs holding the hitch cover in place. This is where the trim pullers are essential. There is almost no space to get behind or grab the fascia to pull it forward. Use cardboard to protect the glossy bumper as you work your way from one side to the other. No two ways about it - have to be super aggressive. Once you pop the first one, the other are a smidge easier. (I watched the Munro Live frunk tear down, but wasn’t confident that would allow easier access to these, and would most likely add a lot more steps removing the frunk liner.) Make sure you have something to super the fascia so it doesn’t droop while you are getting past the mid line. I did not and the fascia kind of warped and partially tore the last two tabs. Don’t worry - there are at least a few on eBay if you completely botch it!

All that’s left is to sand and paint, and reverse the steps (infinitely easier). I was amazed at how well the bedliner texture and black color perfectly matched the adjacent rubber bumper parts. If he scrapes this area again, it will be a quick touch up job. Here is an after photo


