Rivian Mom
Active Wheeler
- Joined
- Oct 20, 2024
- Messages
- 351
- Reaction score
- 30
- Rivian
- R1S
I have seen a lot of Gen 1 owners talking about how not-so-useful their camp speaker is, and some even suggested swapping it for a storage drawer.
Thought about it and decided I should drop a thread for Gen 1 owners who would love to swap their camp speaker for a storage drawer. A Gen 2 storage drawer, to be precise.
Before I installed mine, Rivian said the drawer only works with Gen 2 models. I thought I was out of options, but I found a way. With a few simple tweaks that don’t harm any parts, I got the storage drawer to fit perfectly.
I listed the steps below and tried to be as precise as I could with my explanations for easy understanding.
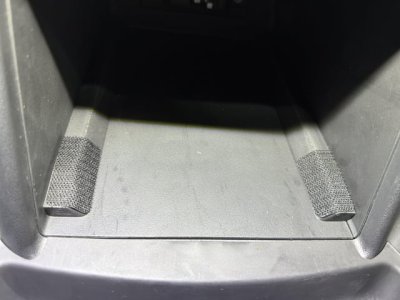
Step one: Grab some Velcro strips—any kind will work. Attach them to the places I marked in my pictures (two on the drawer, two inside the vehicle).


Step two: Slide the drawer in. You’ll need to push a bit firmly to get it to snap into place. Check the vehicle’s display to make sure it’s locked and the system detects the drawer (Gen1 vehicles will pick it up).

Step three: Double-check that the Velcro is sticking tightly. At this point, you’ve got a working storage drawer in your Gen1! But I found an extra trick to make it feel super sturdy, which I’ll share next.

Step four (optional): Pick up some furniture felt pads, or any felt material will do, though the furniture ones are best. Stick two pads together (you’ll need four total). Pull the drawer out a bit for easier access. Then, wedge the felt pads between the drawer’s plastic edge (where the Velcro is) and the vehicle’s trim. Make sure they’re snug on both sides. This keeps the drawer rock-solid with no wobble at all.

Thought about it and decided I should drop a thread for Gen 1 owners who would love to swap their camp speaker for a storage drawer. A Gen 2 storage drawer, to be precise.
Before I installed mine, Rivian said the drawer only works with Gen 2 models. I thought I was out of options, but I found a way. With a few simple tweaks that don’t harm any parts, I got the storage drawer to fit perfectly.
I listed the steps below and tried to be as precise as I could with my explanations for easy understanding.
Step one: Grab some Velcro strips—any kind will work. Attach them to the places I marked in my pictures (two on the drawer, two inside the vehicle).
Step two: Slide the drawer in. You’ll need to push a bit firmly to get it to snap into place. Check the vehicle’s display to make sure it’s locked and the system detects the drawer (Gen1 vehicles will pick it up).
Step three: Double-check that the Velcro is sticking tightly. At this point, you’ve got a working storage drawer in your Gen1! But I found an extra trick to make it feel super sturdy, which I’ll share next.
Step four (optional): Pick up some furniture felt pads, or any felt material will do, though the furniture ones are best. Stick two pads together (you’ll need four total). Pull the drawer out a bit for easier access. Then, wedge the felt pads between the drawer’s plastic edge (where the Velcro is) and the vehicle’s trim. Make sure they’re snug on both sides. This keeps the drawer rock-solid with no wobble at all.